Export a GEDCOM from Other Programs
Table of Contents
- How to export a GEDCOM from Ancestry
- How to export a GEDCOM from MyHeritage
- How to export a GEDCOM from RootsMagic
- How to export a GEDCOM from GRAMPS
- How to export a GEDCOM from Family Tree Maker
- How to export a GEDCOM from Legacy Family Tree Maker
- How to export a GEDCOM from The Master Genealogist
To export a GEDCOM from Ancestry.com Trees:
- From the top menu, select "Trees," then navigate to the tree you want to export.
- In the upper left corner, click the down arrow beside your tree name to show the tree menu.
- Click "Tree Settings"

From the Tree Settings Page:
- Over on the right side of the screen near the bottom, look for the green button "Download your GEDCOM file"
- Click to download your file and save to your computer.
- Important: Make sure the file name ends in .ged. Sometimes the Ancestry downloader will deliver an invalid file which ends in .mht, which is an html file rather than a GEDCOM file. You don't want that. If this does happen to you, try right-clicking on the "Download your GEDCOM file" button and then selecting "Save link as..." This should give you a GEDCOM file (ending in .ged), which is what you want.

To export a GEDCOM from MyHeritage Family Tree Builder:
- From the "File" menu, sSelect Export GEDCOM
- Set options for the export
- Give the file a name and save it somewhere you'll remember
To export a GEDCOM from RootsMagic:
- From the "File" menu, select "Export"
- Select export options.
- If you would only like to export a subset of individuals, click the box under "People to Export" then filter to the desired set of people to include
- Check or un-check data types you want to include or exclude
- Click "Ok"
- Give the file a name and save it somewhere you'll remember
To export a GEDCOM file from the GRAMPS program:
- From the "File" menu, select "Export"
- Review the file overview.
- Click "Next" to continue
- Choose GEDCOM as the export file format to the export options
- From the export options you can:
- Exclude private records
- Exclude living people
- Apply filters
- Review the export summary/calculations. If you're satisfied, click "Next"
- Give the file a name and save it somewhere you'll remember
To export a GEDCOM from Family Tree Maker:
- From the "File" menu, choose "Export File,"
- Choose whether you want to export the entire file ("Entire File") or only certain individuals ("Selected Individuals")
- If you want only certain individuals to be in your file, select them from the options you see after clicking "Selected Individuals"
- In the bottom of the dialog box, change "Save as type" to GEDCOM
- Give the file a name
- Save it somewhere on your computer you'll remember
To export a GEDCOM file from Legacy Family Tree Maker:
- From the "File" menu, select "Export To"
- From the submenu, select GEDCOM file
- Select which options you want included in your GEDCOM file
- In the top right corner of the dialog box, click "Select File Name and Start Export"
- Give your file a name and save it somewhere you'll remember
To export a GEDCOM from The Master Genealogist:
For help exporting a GEDCOM file from TMG The Master Genealogist see "Help:GEDCOM/The Master Genealogist" ( http://www.werelate.org/wiki/Help:GEDCOM/The_Master_Genealogist) which has been copied here with permission.
Help:GEDCOM/The Master Genealogist
Exporting a GEDCOM in TMG is a two-part process if you want to include only some of the people in your Project. First, you select those to be included using either the Project Explorer or the Focus Group, as specified below for Step 4. Then, use the File > Export menu to open the Export Wizard. Step 1 is just the welcome screen - click Next to get to Step 2:
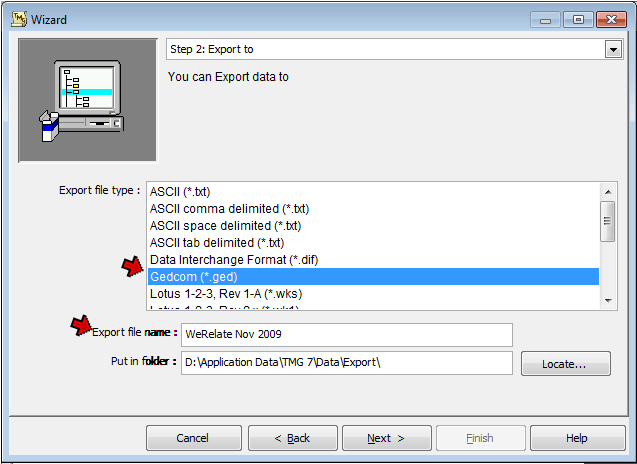
On this screen choose Gedcom (*.ged), and specify a file name. The file will be stored in the folder specified in Preferences unless you specify a different location on the Put in Folder field.
Click Next to move to Step 3. The default values are generally appropriate, so click Next again to move to Step 4

Select the second bullet, next to the name of your TMG Project. Then choose one of the three items below:
All People - Only if you want everyone in your Project to be included.
Selected people in the Project Explorer - To use this, before you start the export wizard, open the Project Explorer, and select the people you want to include in the export. You can select them individually by holding the Ctrl key and clicking on them. Or, you can create a Filter that specifies the desired people, and select everyone who is then displayed. To do that, click on the first person, scroll to the bottom of the list, and hold Shift while clicking on the last person.
People in the Focus Group - This is generally the easiest way to specify a group of people. To use this option, before you start the export wizard, open the Focus Group and add everyone you want to include to the Focus Group. The Add Others function makes it easy to add ancestors, descendants, and spouses to those already in the Focus Group. You usually use the Current Group, but you can use a saved Focus Group by selecting it from the drop-down list.
Click Next to advance to Step 5:

Choose your desired options:
Be sure to check ID Numbers. They will be used to match people in a future enhancement to allow updating via GEDCOM.
Checking Name NPFX/NSFX will export the name prefix and suffix.
If the people you selected in Step 2 include living people, check Suppress Details for Living People.
Click Next to advance to Step 6:

Choose which Tag Types you want to include in the GEDCOM. If you do not want all types of tags included, choose Selected, and a list of your Tag Types will appear as shown above. Select those you want to have included.
You can also chose to include only Primary Tags, and only Primary Names.
Click Next to advance to Step 7. Generally the default values work well. Click Next to advance to Step 8, then click Finish to create the GEDCOM file.